Laying up time
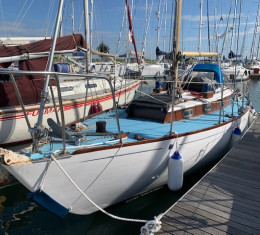
As some of you know we purchased a lovely yacht called Zircon just over a year ago. She is a 44’ Camper and Nicholson Bermudan sloop, built in 1960 as a Class 1 offshore boat. As you might imagine this pedigree makes her an excellent sea boat, and it’s when the seas pick up and the wind starts to blow hard that she comes into her own, effortlessly powering through the water with an easy motion, light helm and good speed. This year we came back from Paimpol, beating hard on starboard tack in a F6-7 with a good sea running and she was magical, even when we were pressing her too hard before the reef went in and she was shipping water over the leeward cockpit coamings, she still only needed one finger on the helm, and apart from the occasional odd wave slapping the forward topsides, we hardly got wet. It’s times like these that having a big heavy and powerful boat is a real blessing.
However, come the winter and our minds turn to laying up and maintenance, the size of this boat starts to be a problem because as we all know the costs can increase disproportionately as the boat gets longer! I have decided to write a series of short blogs throughout the winter following our programme of laying up, maintenance repairs and eventual commissioning in order to show people that boat ownership doesn’t have to be as expensive as you might think, that there is a lot the average person can achieve themselves with a simple tool bag, and give owners a few ideas and tips that they may not otherwise have considered. To many, this will be old news, but to a lot of our clients who are inexperienced or new to the wooden boat world, I hope this will be both informative, interesting and money saving!
We are lucky in Dartmouth in that we have a wide choice when it comes to winter laying up. This winter I am planning to undertake some more in depth structural repairs to the boat that need to be carried out, so I don’t have the choice to leave her covered up on the mooring again as we did last year. This is obviously the cheapest and easiest way to winter a boat. You have already paid for 12 months of mooring fees so why pay the yard another 5-6 months storage. This is how most owners pay for 18 months of storage in every 12! As long as your mooring is secure and sheltered enough, this is the best way to save money. Make sure your lines are in good condition and there is plenty of chaffing gear where it is needed, get some tarpaulins to keep the wet off the deck and superstructure and away you go. Depending on the design of your boat, you can often get a cover that goes over the coachroof and ties to the toe rail, although this doesn’t keep the whole deck dry, it does allow you to leave some portholes open and keep the ventilation throughout the boat. If you remove all the soft furnishings and sails, lift the sole boards and prop open all cupboards and seat backs, the boat should fare well throughout the winter months. If you have a pontoon berth with electricity then get a greenhouse heater and a dehumidifier in the cabin to stop mould and mildew forming all over the cabin.
Leaving wooden boats in for the whole year is no problem, and although the type of construction and materials used will make a difference, a good rule of thumb to follow is two winters afloat, one winter ashore.
I eventually decided to lay the boat up in Old mill Creek, a quiet little backwater a little way up the river with several boat yards, lifting facilities, beach and mud moorings and workshops. I have taken a berth leaning against the pilings where I have electricity, I can walk on and off the boat and most of all she is very sheltered. The creek dries out completely at low water, so because of her 7’3” draft she only floats on a few tides a month, the rest of the time she stays neatly leaning on the piles. This is an ideal situation because it is safe and terribly cheap compared to yard storage ashore which would include lifts, cradle hire and pressure washing, and although there is a little bit of hassle involved to get her in there, ballast her side decks to ensure a permanent heel and adjusting the ropes at the beginning to get them right, it is far more preferable than having to drive to Totnes or Galmpton every time I want to work on the boat. This sort of winter berth may not have crossed many peoples minds because of the hassle factor and the worry, however if you moor her correctly most boats will sit very happily against a wall or piles for the whole winter. If your boat has sheer legs then it is an even easier and more viable option.
My job list this winter is not inconsiderable! The main work will involve removing the galvanised strap floors up forward, having them shot blasted, re-galvanised and replaced along with new bolts and some planking that has been damaged by the corroding floor bolts. Most of the floors were done by a previous owner but the forward ones were not touched unfortunately, meaning we will have to pull apart the forecabin joinery to get at the hull.
It is not going to be possible to replace the planks in her current berth because of the rise and fall of tide, but I have the chance to get her on the slipway next door in the spring, so before then I will do as much of the preparation so the job will be completed as quickly as possible once she has been slipped. I am planning to remove the interior joinery, and then at low tide I can cut off the nuts on the old floor bolts, knock them out, remove the floors and put wooden bungs in the bolt holes. The floors can then go away for galvanising to ensure they are ready to fit back in once the boat is slipped. We are fortunate that the ballast keel does not have to be removed to get at these particular floors, which enables me to do the whole job without having to pay expensive yard fees, and by doing the more straight forward leg work of removing joinery and pulling out the floors, the amount of work, and therefore cost, of hired professional help will be much less.
Other jobs needed include cleaning and painting the bilge, removing the engine to be able to remove the engine beds which will need either re-galvanising or possibly complete replacement depending on the condition once they are out, rebuilding the chart desk, changing the DC switch panels and moving the main battery isolator switches to a safer more sensible position.
The first stage of all this was to get the boat covered over. I chose to build a polytunnel type tent using 32mm black alkythene water pipe for the hoops, with a 3”x2” timber ridge pole and some vertical supports onto the deck. I removed the top guard wire from the stanchions and then pushed the pipe over the top of the stanchion, it’s a tight fit but that makes it nice and secure! This gives you a nice evenly curved hoop with no sharp edges to chafe the cover, and its dirt cheap, the 25m roll of pipe was £30 inc. delivery on the internet. Next the ridge pole went up with a short length of 3×2 at the bow from the pulpit to the first hoop. This is the hardest bit when working on your own, holding the timber up with one hand while trying to bang in a screw with the other, where would we be without lightweight battery drills! Once there is a couple of screws in to hold it, I could then get around to adding the rest of the verticals and lashing the ridge pole at each hoop to make the whole frame nice and rigid. I finished by trimming up the ends of the timber and stapling on bits of carpet here and there to stop the cover rubbing through.
I bought my covers from a very good website called Tarpaflex who seem to be the best value on the internet. I went for two separate ones which makes handling easier, especially when doing it alone, and allows for an access point to the boat just about amidships. I stretched the covers over the frame pulling them from stem to stern and quickly got some lines round underneath to secure the whole thing before the wind got under it and took the whole lot in the river. All in all, after fiddling around with the lines and tweaking everything I have got a very rigid and robust cover that took me a day to construct and cost about £180, not bad considering.

